BCT
CONSTRUCTION
SET
Creating an All New
Scenario, Part II
|
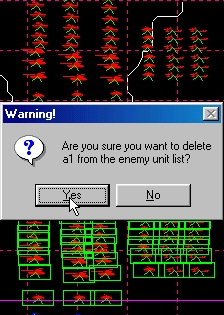
We loaded an Iraqi Division and a US
Armored Brigade. There are lots more units than we will need in our
scenario. Gather the units you do not need off to the sides of the
map. Then use Delete Enemy and Delete Friendly from the Unit
menu to delete them.
For step by step instructions, click
here. |
 |
We are expecting the enemy forces to
defend in our scenario, so the next step will be to add obstacles and
holes. This simplest way to do this is using the Block Add
functions. These functions allow you to add a large number of
engineer works all at one time.
|
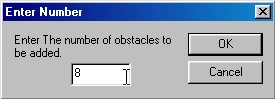
Select the Block Add Enemy
function from the Obstacle menu. You will be
prompted with an Obstacle Dialog, which will allow you to enter the
data for the obstacles you wish to add. When you have entered this
data, you will then be asked how many obstacles you want to create
and how many rows you want them arrayed into. Once you have provided
this information, you will be able to place the obstacles on the map.
For step by step instructions, click
here. |
 |
|
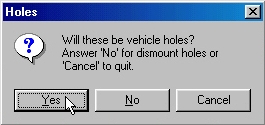
Select the Block Add Enemy
function from the Hole menu. You will be prompted
with a dialog that will ask if you are adding vehicle holes. If you
answer "No", dismount holes will be added. When you have
entered this data, you will then be asked how many holes you want to
create and how many rows you want them arrayed into. Once you have
provided this information, you will be able to place the holes on the map.
For step by step instructions, click
here. |
 |
You've now got all of the game play
components required for this scenario. But it still won't make much
sense to the scenario player. When this scenario is started in BCT,
the player will see a blank map with his units sitting in the
middle. He won't know what to do! We have to communicate to him where
his units should start. We also have to tell him what his units must
do. We are going to do this with Maneuver Graphics.
Note: Generally, a BCT
scenario communicates the mission and limitations of a scenario to
the player using all three components of the OPORD
(Operations Order), Maneuver Graphics, an Enemy SITTEMP, and the
Order. For the sake of brevity, we will only make Maneuver Graphics now.
|
Maneuver Graphics and other OPORD
elements can only created using the BCT OPORD Writer.
To start it, select the BCT OPORD Writer function
from the OPORD menu. This will start the
application. To draw graphics, you must have a map loaded. Select Open
from the File menu in the OPORD Writer.
Select the same map you used to create your scenario. This map will
be loaded into the OPORD Writer.
For step by step instructions, click
here. |
 |
|
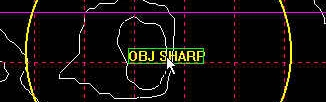
With the BCT OPORD Writer
loaded, you can begin drawing your maneuver graphics. You will need
to draw boundaries to tell the player where his forces may operate
and where he will probably find the enemy. You should add an LD/LC
(Line of Departure/Line of Contact) to tell the player what line his
forces should start behind. Next, you should add a "Recon LOA
(Limit of Advance)". This tells the player that his forces must
start behind the line you draw. Finally, you should add an objective,
so that the player will know where he must go.
For step by step instructions, click
here. |
 |
|
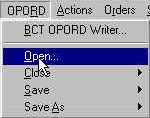
Now it is time to close the BCT
OPORD Writer. To use the graphic you have created, you must
load it into your scenario. To do this, go back the BCT
Construction Set. Select the Open function
from the OPORD menu and select the graphic file that
you created and save using the OPORD Writer. You
will be warned about overwriting your current graphics. Click
"OK" and your new graphic will be added to the scenario.
For step by step instructions, click
here. |
 |

All contents of this web
site and BCT: Brigade Combat Team are the copyright ©1998 of
ProSIM Co. Windows and Windows 95 are the registered trademarks of
the Microsoft Corporation. Any pictures not bearing the ProSIM or BCT
logo, or any graphic resources thereof, are believed to be public
domain and freely distributable. Please address questions or comments
concerning this site to webmaster@prosimco.com.